In this blog we focus on the second most important item you should have as part of your essential outdoor equipment: some form of reliable combustion device; and why fire and the ability to use it correctly is a vital wilderness skill.
The Importance of Fire
From the dawn of time, humankind has needed fire to; keep warm, cook and preserve food, boil water, make tools and weapons, to provide protection from danger, to light the way to see at night and above all, provide a sense of morale and wellbeing.
Out of all the outdoor skills, probably “the” most important of them all is the ability to make and manage fire under all conditions.
“Possessing the means and knowledge to light fire at any moment is a prerequisite for living and surviving in the bush.”
– Mors Kochanski 1987
The ability to make and use fire is just as relevant today as it has been for thousands of years. The modern equivalent of fire is electricity. Everything you use in your home that needs it has its roots in fire. In the wild, fire is your electricity!
fire
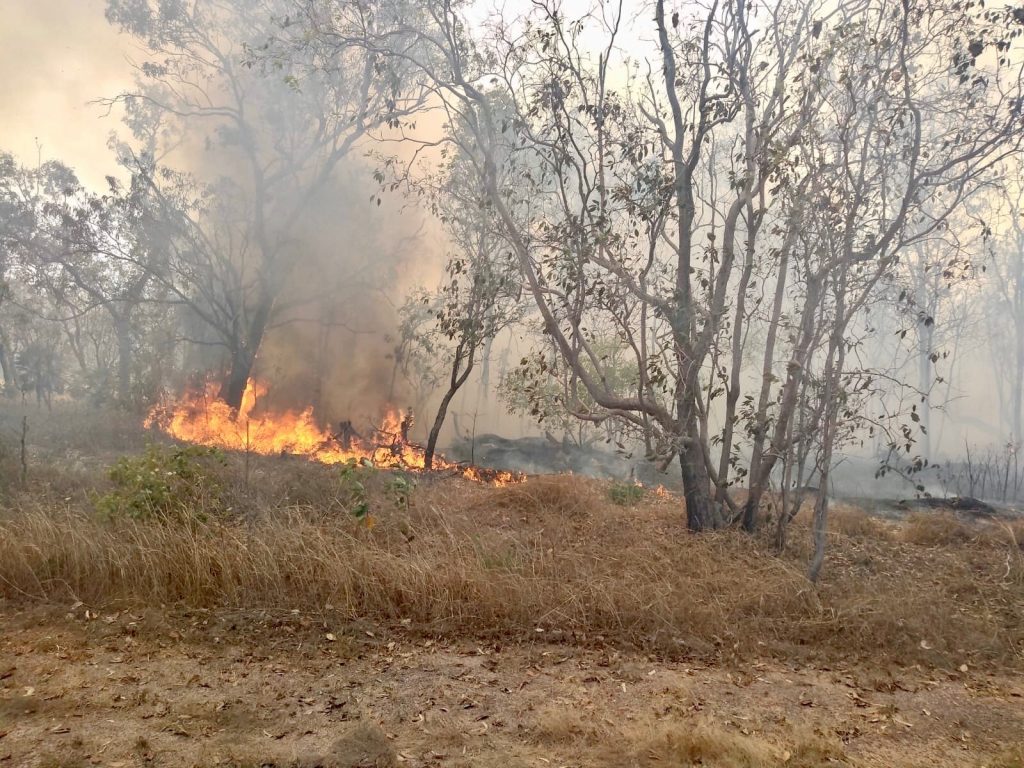
For over 65,000 years Aboriginal people have cared for and managed the land through a complex system of active and predictable land management. They used fire and the life cycles of native plants to ensure plentiful wildlife and plant foods such as grass seeds and tubers throughout the year.
Across Australia in 1788, early Europeans commented again and again that the land looked like a park or English estate. What were extensive grassy patches and pathways (where thick wooded areas are now) and open woodlands free of undergrowth…are now dense scrub. This park-like estate was created over thousands of years using precise (not random) fire management.
Unfortunately, this valuable and necessary fire management practise stopped when the Aboriginal culture over most of Australia was displaced and destroyed with the arrival of Europeans and their livestock. Traditional people were no longer able to tend their country as they had done for thousands of years, and it became overgrown and vulnerable to the hugely damaging bushfires we now experience.
Aboriginal people in the north have to this day continued their time tested methods of fire stick farming and land management. Knowing which plants tolerate and need fire for germination and when, how much and when not to burn, has created a planned tapestry of lush woodland and grassy areas for seed, devoid of dense undergrowth. These precise methods of fire management, mastering timing and intensity (cool and hot fires) are crucial to support various plant and animal communities.
Fire Safety and Considerations
Before you create any type of fire, you have to first ask yourself a couple of questions;
Should I have a fire?
Is it safe to do so, necessary, appropriate and legal?
What is the purpose of the fire?
Is it to cook with or boil water, is it to keep you warm or to keep insects away etc, do you need embers or flames, what size fuel and what types of wood do you need, what type of fire lay do you need?
Plan ahead
How long will you be there, what do you need the fire to do, how will you clean up and leave no trace after you have finished?
Once you have answered these questions you need to prepare the area accordingly so that it is safe and there is no chance that the fire could spread accidentally. In recent years many bushfires in Australia have been started either deliberately or simply because an increasing number of people do not know how to light and manage a fire, and clean up properly afterwards. To light and manage a fire correctly you need to:
- Site the fire appropriately -select a clear area and don’t light it on ground that could burn easily eg. dried mulch like paperbark swamp soil or peat.
- Clear at least a 2-3 metre radius of bare earth from the centre of the fire
- don’t light a fire in windy conditions, particularly if it is dry
- don’t burn rubbish! Select dead dry standing wood that will burn cleanly.
- Most people have fires that are way too large, a small cooking fire is all you need 95% of the time. A small fire will not produce a hot enough thermal column to carry embers a long way if at all.
Preparation, Preparation, Preparation
Success in fire lighting is all about preparation. If you fail to prepare properly you will prepare to fail! The greater the need for fire, the more difficult it is.
- Collect dry, dead standing wood: Don’t collect wood from the ground as it holds moisture and will smoke or not light at all!
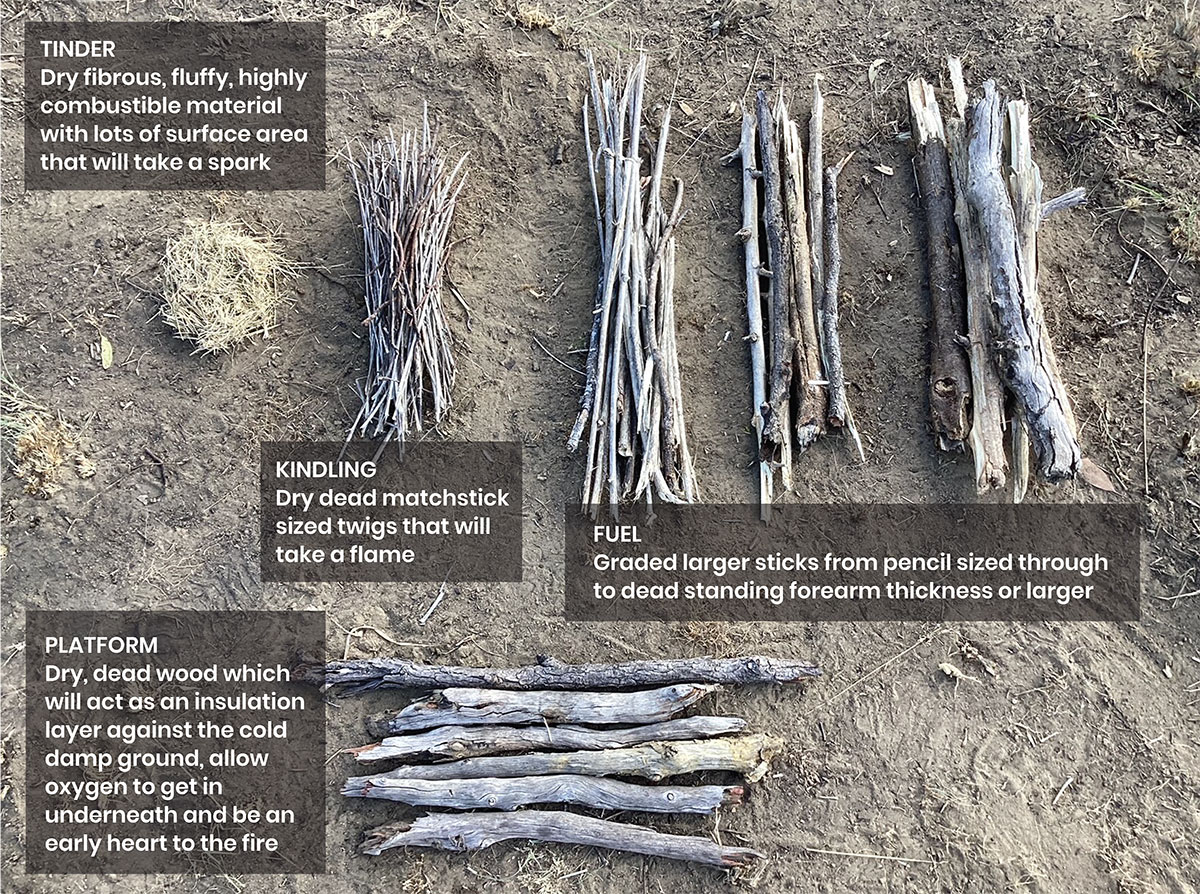
- Parallel Platform: Lay 6-8 thumb thickness sticks (30cm long) side by side. This will provide an early heart to the fire, allow oxygen to get in under the fire and most importantly, provide a moisture barrier, insulating the fire from the cold damp ground. Your success or failure in firelighting is dependant upon this point…particularly in a colder/wetter environment.
- Tinder: two good sized handfuls of fibrous, fluffy, highly combustible material with lots of surface area (like a birds nest or cotton wool). You may have to create this by buffing it up in your hands first. It needs to readily take a spark or easily catch fire when a smouldering ember is added.
- Kindling: three good sized handfuls of matchstick sized dry dead twigs. You will need more in wetter, colder environments.
- Fuel:1-2 foot lengths of dry dead wood (bigger than kindling) graded from small to large…thumb thickness, wrist thickness and beyond
Ignition Methods
There are six different methods of creating fire, however within these methods there are many variations. These six methods are:
Percussion – striking two objects together to produce a spark (stone on stone, metal on stone/flint). Examples are flint and steel, cigarette lighter, Ferrocerium rod.
Friction– the rubbing together of two pieces of specific wood, either along the grain, across the grain or drilling into the grain to create heat and a glowing coal. Examples are bow drill, hand drill, fire plough, fire saw, fire thong
Solar – harnessing the suns rays through use of a magnifying glass or parabolic lens to create heat resulting in a glowing coal or flame. Examples are a magnifying lens and kangaroo dung or a piece of charcloth and the parabolic dish from a car headlight.
Electrical – using electricity to create a circuit to heat an element. Examples are various kinds of batteries (AA, 9V, 12V, car battery) combined with steel wool (element) or jumper leads to creat the circuit to set fire to tinder. Natural electricity is lightning.
Chemical – various chemicals mixed together will produce an exothermic reaction (chemical change accompanied by a liberation of heat). Examples include Potassium Permanganate (KMnO4) and Sugar 50:50 mix, Potassium Permanganate and Glycerine or Brake Fluid, common household matches produce an exothermic reaction when struck.
Compression – if you compress air fast enough in an enclosed space you will produce heat. A diesel engine works on compression to produce heat. A fire piston is the classic combustion device that uses compression.
You should always have at least 3 reliable methods of starting a fire on your person and in your pack. A good combination of modern devices would be a cigarette lighter, a Fresnel magnifying lens and a Ferrocerium rod.
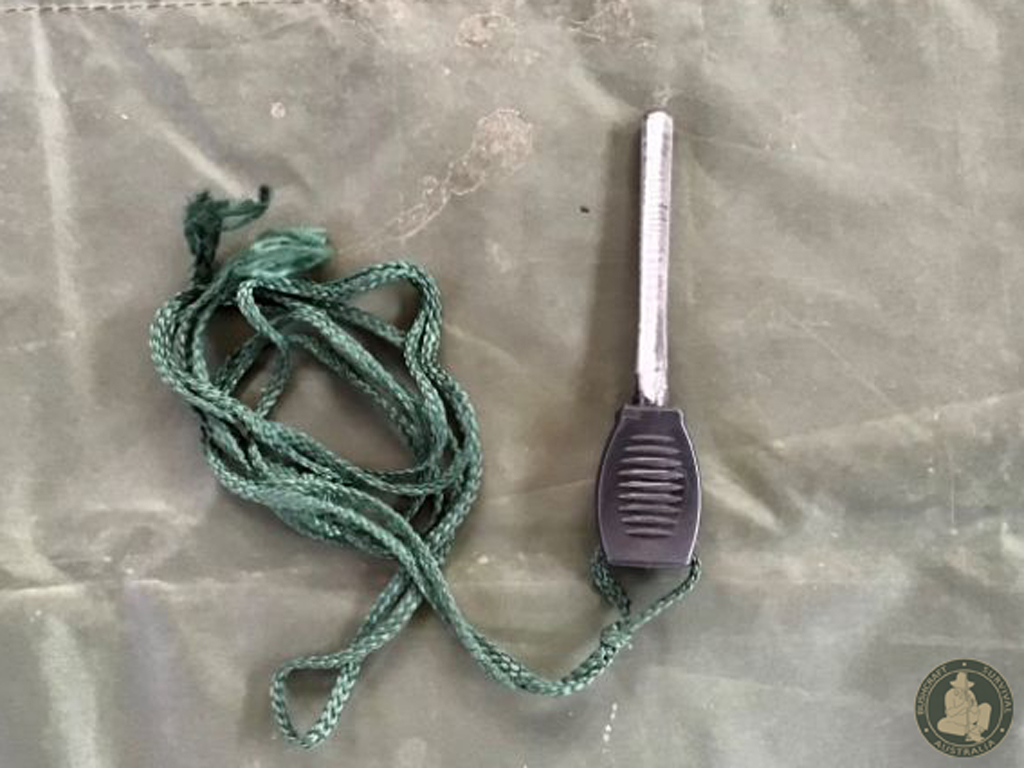
Ferrocerium Rod
Also known as a metal match, fire flash or fire striker, a Ferrocerium (FeS2) rod is made up of pyrophoric materials such as magnesium, iron and various alloys that produce a very hot shower of sparks (up to 3000 degrees) when an object with a sharp 90 degree edge (harder than the rod) is scraped at speed along the side of the rod.
It does not produce guaranteed flame so you need to ensure that your tinder is prepared correctly (dry and fluffy with lots of surface area) so that it will accept a spark and turn to flame.
The great thing about Ferro rods is that they work even when they are wet or in the cold and they have literally thousands of strikes in them.
Proper technique is important when using a Ferro rod so as to ensure ignition with minimal strikes (one to three at the most).
Many Ferro rods come with their own strikers but I have found through experience that these do not work particularly well as they a) don’t have a sharp enough edge, producing a poor amount of small sparks b) are too short and c) are attached to the rod with too short a lanyard. These factors individually or combined cause the user to use incorrect technique resulting in failure to light anything other than man-made cotton wool!
It is much better to use the spine of your knife (ensuring it has a sharp 90 degree edge) which will produce a much greater number of hot shavings ensuring ignition.
Morakniv make a number of good outdoor knives that have purpose built sharp 90 degree spines for use with Ferro rods. Examples include the Bushcraft Black, Kansbol, Eldris, Companion Spark and Garberg. Using the back of the saw blade on many Leatherman multi-tools will also produce a good amount of sparks.
There are many different models of Ferro rods available out there in a variety of shapes and sizes. The quality of the Ferrocerium however is not consistent or always of good quality, either too hard or too soft, so you will have to experiment. Get yourself the bigger army sized models as these will give you a longer and thicker surface area and are easier to hold ensuring better technique and greater success.
Swedish company Morakniv make a good army sized fire starter as do “Light My Fire”. Get yourself the thicker army model but take off the striker.
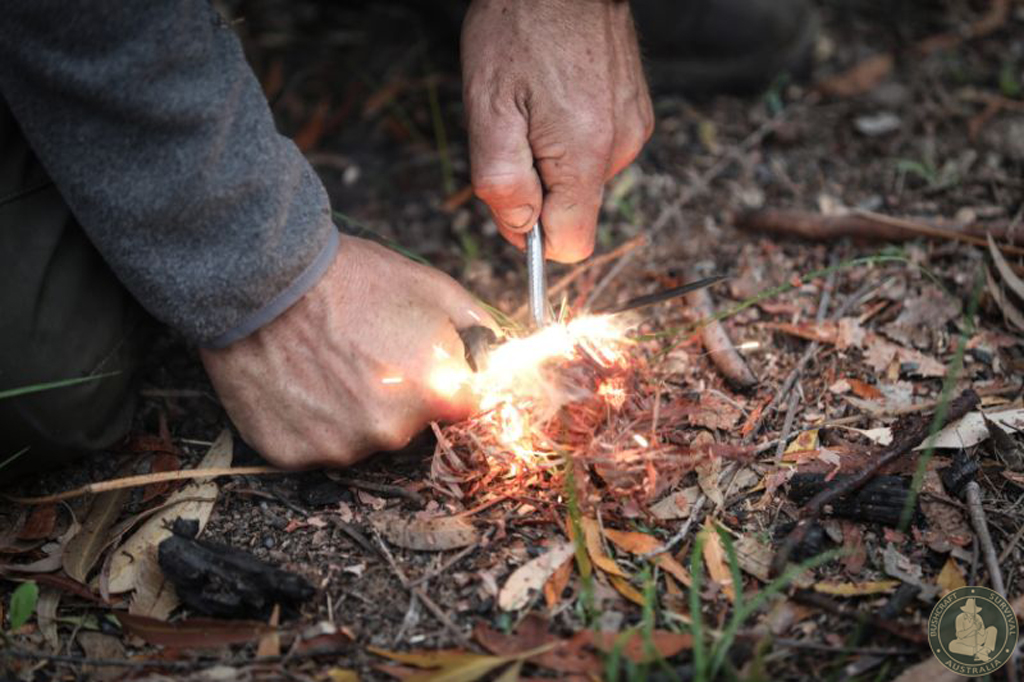
Using a Ferro Rod Correctly
Your success in using a Ferro rod to light a fire is dependant upon three things; your equipment, your technique and your tinder preparation. If one of these areas is not right you will struggle.
- Ensure you have a decent Ferro rod, a sharp 90 degree striker such as the back of your knife and your tinder properly selected and properly prepared
- Kneeling down with your knife in your master hand (blade up) and your Ferro rod in your non master hand, anchor your knife hand either on the ground, on your knee or on your boot (this will depend on the height and proximity of your tinder bundle).
- Point the Ferro rod at the centre of the tinder bundle (no more than 1 or 2 centimetres from it) at a 45 degree angle. Where the rod is pointing is where the sparks will go! The spine of your knife should be on top of the ferro rod with the blade uppermost pointing away from you at a 45 degree angle so that only one corner of the spine is in contact with the Ferro rod
- Ensuring that your knife hand does NOT move, pull the Ferro rod back towards you in a fast scraping motion so that the corner of your knife spine scrapes along the entire length of your Ferro rod, producing a large shower of sparks
- If your tinder is dry and properly prepared and your technique correct with the Ferro rod pointing where you want the sparks to go, you should achieve ignition on your first strike. If it takes more than 3 strikes to achieve ignition then one of the 3 variables (equipment, technique, tinder) is not correct.
Building your fire
- Assuming you have done your preparation correctly ahead of time (parallel platform, kindling, fuel), after your tinder bundle has ignited, gently place two handfuls of cris-crossed matchstick sized kindling on top of your burning tinder bundle which should be on top of your fire platform. Do not just drop the kindling on or you may snuff out your tinder bundle.
- After the flames have come through the top of the kindling you then add your next grade of fuel, placing them in tepee fashion around the fire so that the apex is cris-crossed over the top of the flames.
- As the flames come through the top you can then add your next grade of fuel and so on and so forth.
If you have done this correctly, you should be able to achieve a sustainable fire (one that will not go out) in under five minutes. The flames will always be at their largest when you first light your fire but will soon die down to a small fire once it establishes itself.
Remember that a small cooking fire is all that you need and that most people have fires that are way too large.

Cleaning up and leaving no trace
Perhaps the most neglected area of fire management I have noticed in this country is the inability of people to clean up after themselves and “leave no trace” or at least minimal sign you were ever there. It’s all about respect.
This involves planning ahead and knowing how long you are going to be there. If you are camping overnight and leaving the next morning, the correct procedure would be to:
- Only use enough firewood for your needs, remember people generally have fires that are way too big.
- Allowing for a morning “cuppa”, let the fire burn down to ash. The aim is to let the fire fully consume itself (burning everything) leaving only ash and not have lots of unburnt pieces of wood left over which is considered poor fire etiquette.
- If you have timed this right and only have ash left over, extinguish the ash with a good amount of water until it is cool to touch (low on water, urinate on it).
- Pick the damp ash and char up in your hands and scatter about.
- Any large unburnt pieces of wood (which you shouldn’t have if you timed things right) you can lean vertically against a tree.
- Refurbish the area with debris and blend it in so so that it looks natural like you were never there.
- Take any rubbish with you.
Another great article, it is well written. I was very pleased to see Mors quoted at the start, there was something special about him, I could listen to him talk for hours.
Fire is a great skill to learn and even better to teach, the reaction of someone who has just blown there first flame is priceless.
I hope the leave no trace catches on more in Australia, it is slowly so there is hope and with people like you promoting it I’m sure it will continue.
Thanks Justin, I appreciate it.
Mors was an amazing person and a sad loss to the bushcraft world. I was not fortunate enough to have studied with him but many people I know have…what a legend!
Yes, Australia has a long way to go as far as our attitude is concerned about many things. I hope that more Australian’s will grow to have a deeper respect for the bush, nature and our indigenous heritage rather than just a shallow superficial one. It is slowly improving though.
Thanks for reading Justin.
Warm regards
Gordon
Great post, Thankyou. One of the most comprehensive articles on fire I’ve ever read.
Thanks Scott, I really appreciate the feedback and glad that you enjoyed the article and found it helpful. Please feel free to share it to let others know.
Gordon
Great article Gordo! I always drop the kindling:( But I’m practicing not being afraid of my own fires haha.
I especially appreciated your notes on traditional fire management practice. I’m only just really starting to learn about this and it amazes me how far we still have to come as a country, both environmentally as well as socially. Thanks again for the insightful blog post as always!
You’re welcome Nat. Yes we have a long way to go in Australia in regard to fully appreciating and truly respecting the wealth of natural knowledge that our indigenous Australian’s have. This ignorance which sadly still exists today, although I think it is slowly changing, can only be transformed into valuing their wonderful culture through proper undiluted education. Traditional indigenous fire management practises are a great way to start. It worked for 65000 years, we just have to listen.
Keep hold of that kindling!
Thanks Gordon, that’s solid advice there. I found it very useful especially about the correct use of the ferro rod.
Im glad you found it useful Ross. There is a lot of rubbish out there on YouTube showing incorrect ferro rod use and fire management. Many marginal tinders would not work at all with some of these incorrect methods. You can see a demonstration on the correct way to use a Ferro Rod on the BSA YouTube channel.. “lighting a fire with paperbark” episode which is pretty old now. Paul Kirtley also has some great advice on how to use them properly. Thanks for reading.
Gordon
Excellent informative piece of work.
I grew up watching “The Bushtucker Man” and Malcom Douglass and I really enjoy watching all your work and sharing the info with my 2 boys.
Hopefully people learn to respect the land a lot more.
Keep up.the good work.
Cheers Nev.
Top notch article mate. Keep up the good work.
My pleasure. Thanks for reading.
A great article.
Interested to see your quote from Mors Kochanski. I hadn’t encountered his material until I started researching bush knives. Was very impressed by what I read of his accumulated wisdom.
Mors is one of the fathers and figure heads of western Bushcraft with skills and experience unmatched by many. Sadly he passed away only late last year and he will be missed by the entire Bushcraft world, but his contributions to it will not be forgotten.
His book “Bushcraft” is a great book and deserves a place on every survivalists bookshelf. Thanks for reading.
Thanks a great article, I appreciated the details on the correct use of a ferrocerium rod. I liked the comments about many fires just being bigger than needed, and harder to clean up afterwards. I am enjoying using a Firebox stove among other twig stove to help keep the fire small and leave very little trace of having had a fire. Your comment on “using dry, dead standing wood.” is most helpful as I have often collected wood from the ground. I am still needing to work in my technique to minimise smoke particularly when just starting a fire so this may help. Thank you.
Hello David, I’m glad you enjoyed the article. Yes, many people have fires that are too large. For some reason people think bigger is better but it’s the opposite.
Some of those small fire stoves work quite well. Sometimes I use an improvised hobo stove (video coming soon) when I can’t have a proper fire but that is very rare.
Thanks for reading.
Gordon
Hi
A great read, I teach remote area first aid and would love to have permission to reference your site.
I do a bit of a “Harry’s recommended things”
Apps – Gear ect your info is awesome and I know the learners would love it.
Hi Harry, I’m glad you find the information useful. Please feel free to share it with your students. Next year we will be looking to run a 2 day Wilderness First Aid Module on top of our 3 day Module 1 Bushcraft Survival Course. Thanks for reading
Gordon